API Quickstart
Introduction
This document details how to setup a local reference architecture, and design and deploy an API. This will show the following API management features in a kube native environment using Kuadrant and other open source tools:
- API design
- API security and access control
- API monitoring
- Traffic management and scalability
The sections in this document are grouped by the persona that is typically associated with the steps in that section. The 3 personas are:
- The platform engineer, who provides and maintains a platform for application developers,
- the application developer, who designs, builds and maintains applications and APIs,
- and the api consumer, who makes API calls to the API
Pre-requisities
docker: https://www.docker.com/products/docker-desktop/kind: https://kind.sigs.k8s.io/kubectl: https://kubernetes.io/docs/reference/kubectl/kustomize: https://kustomize.io/helm: https://helm.sh/docs/intro/install/operator-sdk: https://sdk.operatorframework.io/docs/installation/- An AWS account with a Secret Access Key and Access Key ID. You will also need to a Route 53 zone.
(Platform engineer) Platform Setup
Export the following env vars:
export KUADRANT_AWS_ACCESS_KEY_ID=<key_id>
export KUADRANT_AWS_SECRET_ACCESS_KEY=<secret>
export KUADRANT_AWS_REGION=<region>
export KUADRANT_AWS_DNS_PUBLIC_ZONE_ID=<zone>
export KUADRANT_ZONE_ROOT_DOMAIN=<domain>
Clone the api-quickstart repo and run the quickstart script:
This will take several minutes as 3 local kind clusters are started and configured in a hub and spoke architecture. The following components will be installed on the clusters:
- Hub
- Open Cluster Management, as a 'hub' cluster
- Kuadrant Multi Cluster Gateway Controller, for managing a Gateway in multiple clusters centrally
- Gatekeeper, for constraints on Gateway Policy requirements
- Thanos, for receiving metrics centrally
- Grafana, for visualising API & Gateway metrics
- Spoke x2
- Open Cluster Management, as a 'spoke' cluster
- Kuadrant Operator, for auth and rate limiting policies attached to a HTTPRoute
- Istio, with the Gateway API CRDs as the Gateway for ingress trafic
- MetalLB, for exposing the Gateway service on the local network
- Prometheus, for scraping and federating metrics to the hub
Verify the Gateway and configuration
View the ManagedZone, Gateway and TLSPolicy. The ManagedZone and TLSPolicy should have a Ready status of true. The Gateway should have a Programmed status of True.
kubectl --context kind-api-control-plane get managedzone,tlspolicy,gateway -n multi-cluster-gateways
Guard Rails: Constraint warnings about missing policies ( DNS, TLS)
Running the quick start script above will bring up Gatekeeper and the following constraints:
- Gateways must have a TLSPolicy targeting them
- Gateways must have a DNSPolicy targeting them
To view the above constraints in kubernetes, run this command:
Info
Since a gateway has been created automatically, along with a TLSPolicy, the violation for a missing DNSPolicy will be active until one is created.
Grafana dashboard view
To get a top level view of the constraints in violation, the Stitch: Platform Engineer Dashboard can be used. This can be accessed by at https://grafana.172.31.0.2.nip.io
Grafana has a default username and password of admin.
You can find the Stitch: Platform Engineer Dashboard dashboard in the Default folder.
Create the missing DNSPolicy
Create a DNSPolicy that targets the Gateway with the following command:
kubectl --context kind-api-control-plane apply -f - <<EOF
apiVersion: kuadrant.io/v1alpha1
kind: DNSPolicy
metadata:
  name: prod-web
  namespace: multi-cluster-gateways
spec:
  targetRef:
    name: prod-web
    group: gateway.networking.k8s.io
    kind: Gateway
  loadBalancing:
    geo:
      defaultGeo: EU
EOF
Platform Overview
Since we have created all the policies that Gatekeeper had the guardrails around, you should no longer see any constraints in violation. This can be seen back in the Stitch: Platform Engineer Dashboard in Grafana at https://grafana.172.31.0.2.nip.io
(Application developer) App setup
API Design
Fork and/or clone the Petstore App at https://github.com/Kuadrant/api-petstore
git clone git@github.com:kuadrant/api-petstore && cd api-petstore
# Or if you forked the repository:
# git clone git@github.com:<your_github_username>/api-petstore && cd api-petstore
Then deploy it to the first workload cluster:
This will deploy:
- A
petstoreNamespace - A
Secret, containing a static API key that we'll use later for auth - A
ServiceandDeploymentfor our petstore app - A Gateway API
HTTPRoutefor our petstore app
Route 53 DNS Zone
When the DNS Policy has been created, and the previously created HTTPRoute has been attached, a DNS record custom resource will also be created in the cluster resulting in records being created in your AWS Route53. Navigate to Route53 and you should see some new records in the zone.
Configuring the region label
Configure the app REGION to be eu:
Exploring the Open API Specification
The raw Open API spec can be found in the root of the repo:
(Application developer) API security
We've included a number of sample x-kuadrant extensions in the OAS spec already:
- At the top-level of our spec, we've defined an
x-kuadrantextension to detail the Gateway API Gateway associated with our app:
  x-kuadrant:
    route:
      name: petstore
      namespace: petstore
      labels:
        deployment: petstore
        owner: cferreir
      hostnames:
      - petstore.$KUADRANT_ZONE_ROOT_DOMAIN
      parentRefs:
      - name: prod-web
        namespace: kuadrant-multi-cluster-gateways
        kind: Gateway
- In
/user/login, we have a Gateway APIbackendRefset and arate_limitset. The rate limit policy for this endpoint restricts usage of this endpoint to 2 requests in a 10 second window: - In
/store/inventory, we have also have a Gateway APIbackendRefset and arate_limitset. The rate limit policy for the endpoint restricts usage of this endpoint to 10 requests in a 10 second window: - Finally, we have a
securitySchemesetup for apiKey auth, powered by Authorino. We'll show this in more detail a little later:
These extensions allow us to automatically generate Kuadrant Kubernetes resources, including AuthPolicies, RateLimitPolicies and Gateway API resources such as HTTPRoutes.
kuadrantctl
kuadrantctl is a cli that supports the generation of various Kubernetes resources via OAS specs.
Let's run some commands to generate some of these resources.
If you forked the api-pestore repo, you can check them in also.
Let's apply these to our running workload to implement rate limiting and auth.
Installing kuadrantctl
Download kuadrantctl from the v0.2.0 release artifacts:
https://github.com/Kuadrant/kuadrantctl/releases/tag/v0.2.0
Drop the kuadrantctl binary somewhere into your $PATH (e.g. /usr/local/bin/).
For this next part of the tutorial, we recommend installing yq to pretty-print YAML resources.
Generating Kuadrant resources with kuadrantctl
We'll generate an AuthPolicy to implement API key auth, per the securityScheme in our OAS spec:
# Generate this resource and save:
kuadrantctl generate kuadrant authpolicy --oas openapi.yaml | yq -P | tee resources/authpolicy.yaml

# Apply this resource to our cluster:
kubectl --context kind-api-workload-1 apply -f ./resources/authpolicy.yaml
Next we'll generate a RateLimitPolicy, to protect our APIs with the limits we have setup in our OAS spec:
# Generate this resource and save:
kuadrantctl generate kuadrant ratelimitpolicy --oas openapi.yaml | yq -P | tee resources/ratelimitpolicy.yaml

# Apply this resource to our cluster:
kubectl --context kind-api-workload-1 apply -f ./resources/ratelimitpolicy.yaml
Lastly, we'll generate a Gateway API HTTPRoute to service our APIs:
# Generate this resource and save:
kuadrantctl generate gatewayapi httproute --oas openapi.yaml | yq -P | tee resources/httproute.yaml

# Apply this resource to our cluster, setting the hostname in via the KUADRANT_ZONE_ROOT_DOMAIN env var:
kustomize build ./resources/ | envsubst | kubectl --context kind-api-workload-1 apply -f-
Check our applied policies
Navigate to your app's Swagger UI:
RateLimitPolicy
Let's check that our RateLimitPolicy for the /store/inventory has been applied and works correctly. Recall, our OAS spec had the following limits applied:
/store/inventory API, click Try it out, and Execute.
You'll see a response similar to:
This API has a rate limit applied, so if you send more than 10 requests in a 10 second window, you will see a 429 HTTP Status code from responses, and a "Too Many Requests" message in the response body. Click Execute quickly in succession to see your RateLimitPolicy in action.
AuthPolicy
Let's check that our AuthPolicy for the /store/admin endpoint has been applied and works correctly. Recall, our OAS spec had the following securitySchemes applied:
Navigate to the /store/admin API, click Try it out, and Execute.
You'll get a 401 response.
You can set a value for the api_key header by clicking Authorize at the top of the page. Set a value of secret.
This api key value is stored in the petstore-api-key Secret in the petstore namespace.
Try the /store/admin endpoint again and you should get a 200 response with the following:
Policy Adjustments
Run the Swagger UI editor to explore the OAS spec and make some tweaks:
You should be able to access the Swagger Editor at http://localhost:8080.
Our /store/inventory API needs some additonal rate limiting. This is one of our slowest, most expensive services, so we'd like to rate limit it further.
In your openapi.yaml, navigate to the /store/inventory endpoint in the paths block. Modify the rate_limit block to further restrict the amount of requests this endpoint can serve to 2 requests per 10 seconds:
Save your updated spec - File > Save as YAML > and update your existing openapi.yaml. You may need to copy the file from your Downloads folder to the location of the petstore repository.
Next we'll re-generate our RateLimitPolicy with kuadrantctl:
# Generate this resource and save:
kuadrantctl generate kuadrant ratelimitpolicy --oas openapi.yaml | yq -P | tee resources/ratelimitpolicy.yaml

# Apply this resource to our cluster:
kubectl --context kind-api-workload-1 apply -f ./resources/ratelimitpolicy.yaml
At this stage you can optionally check in all the changes to the repo if you forked it.
# Optionally add, commit & push the changes to your fork
git add resources
git commit -am "Generated AuthPolicy,RateLimitPolicy & HTTPRoute"
git push # You may need to set an upstream as well
In your app's Swagger UI:
Navigate to the /store/inventory API one more, click Try it out, and Execute.
You'll see the effects of our new RateLimitPolicy applied. If you now send more than 2 requests in a 10 second window, you'll be rate-limited.
Note:  It may take a few minutes for the updated RateLimitPolicy to be configured with the modified rate limit.
(Application developer) Scaling the application
Deploy the petstore to the 2nd cluster:
kustomize build ./resources/ | envsubst | kubectl --context kind-api-workload-2 apply -f-
kubectl --context kind-api-workload-2 apply -f ./resources/authpolicy.yaml
kubectl --context kind-api-workload-2 apply -f ./resources/ratelimitpolicy.yaml
Configure the app REGION to be us:
(Platform engineer) Scaling the gateway and traffic management
Deploy the Gateway to the 2nd cluster:
kubectl --context kind-api-control-plane patch placement http-gateway --namespace multi-cluster-gateways --type='json' -p='[{"op": "replace", "path": "/spec/numberOfClusters", "value":2}]'
Label the 1st cluster as being in the 'EU' region, and the 2nd cluster as being in the 'US' region. These labels are used by the DNSPolicy for configuring geo DNS.
kubectl --context kind-api-control-plane label managedcluster kind-api-workload-1 kuadrant.io/lb-attribute-geo-code=EU --overwrite
kubectl --context kind-api-control-plane label managedcluster kind-api-workload-2 kuadrant.io/lb-attribute-geo-code=US --overwrite
(API consumer) Accessing the API from multiple regions
Info
This section is optional. If you'd rather skip this part, you can skip forward to the "(App developer) API traffic monitoring" section.
Pre-requisites
python3andpip3: these are required for this part of the walkthrough
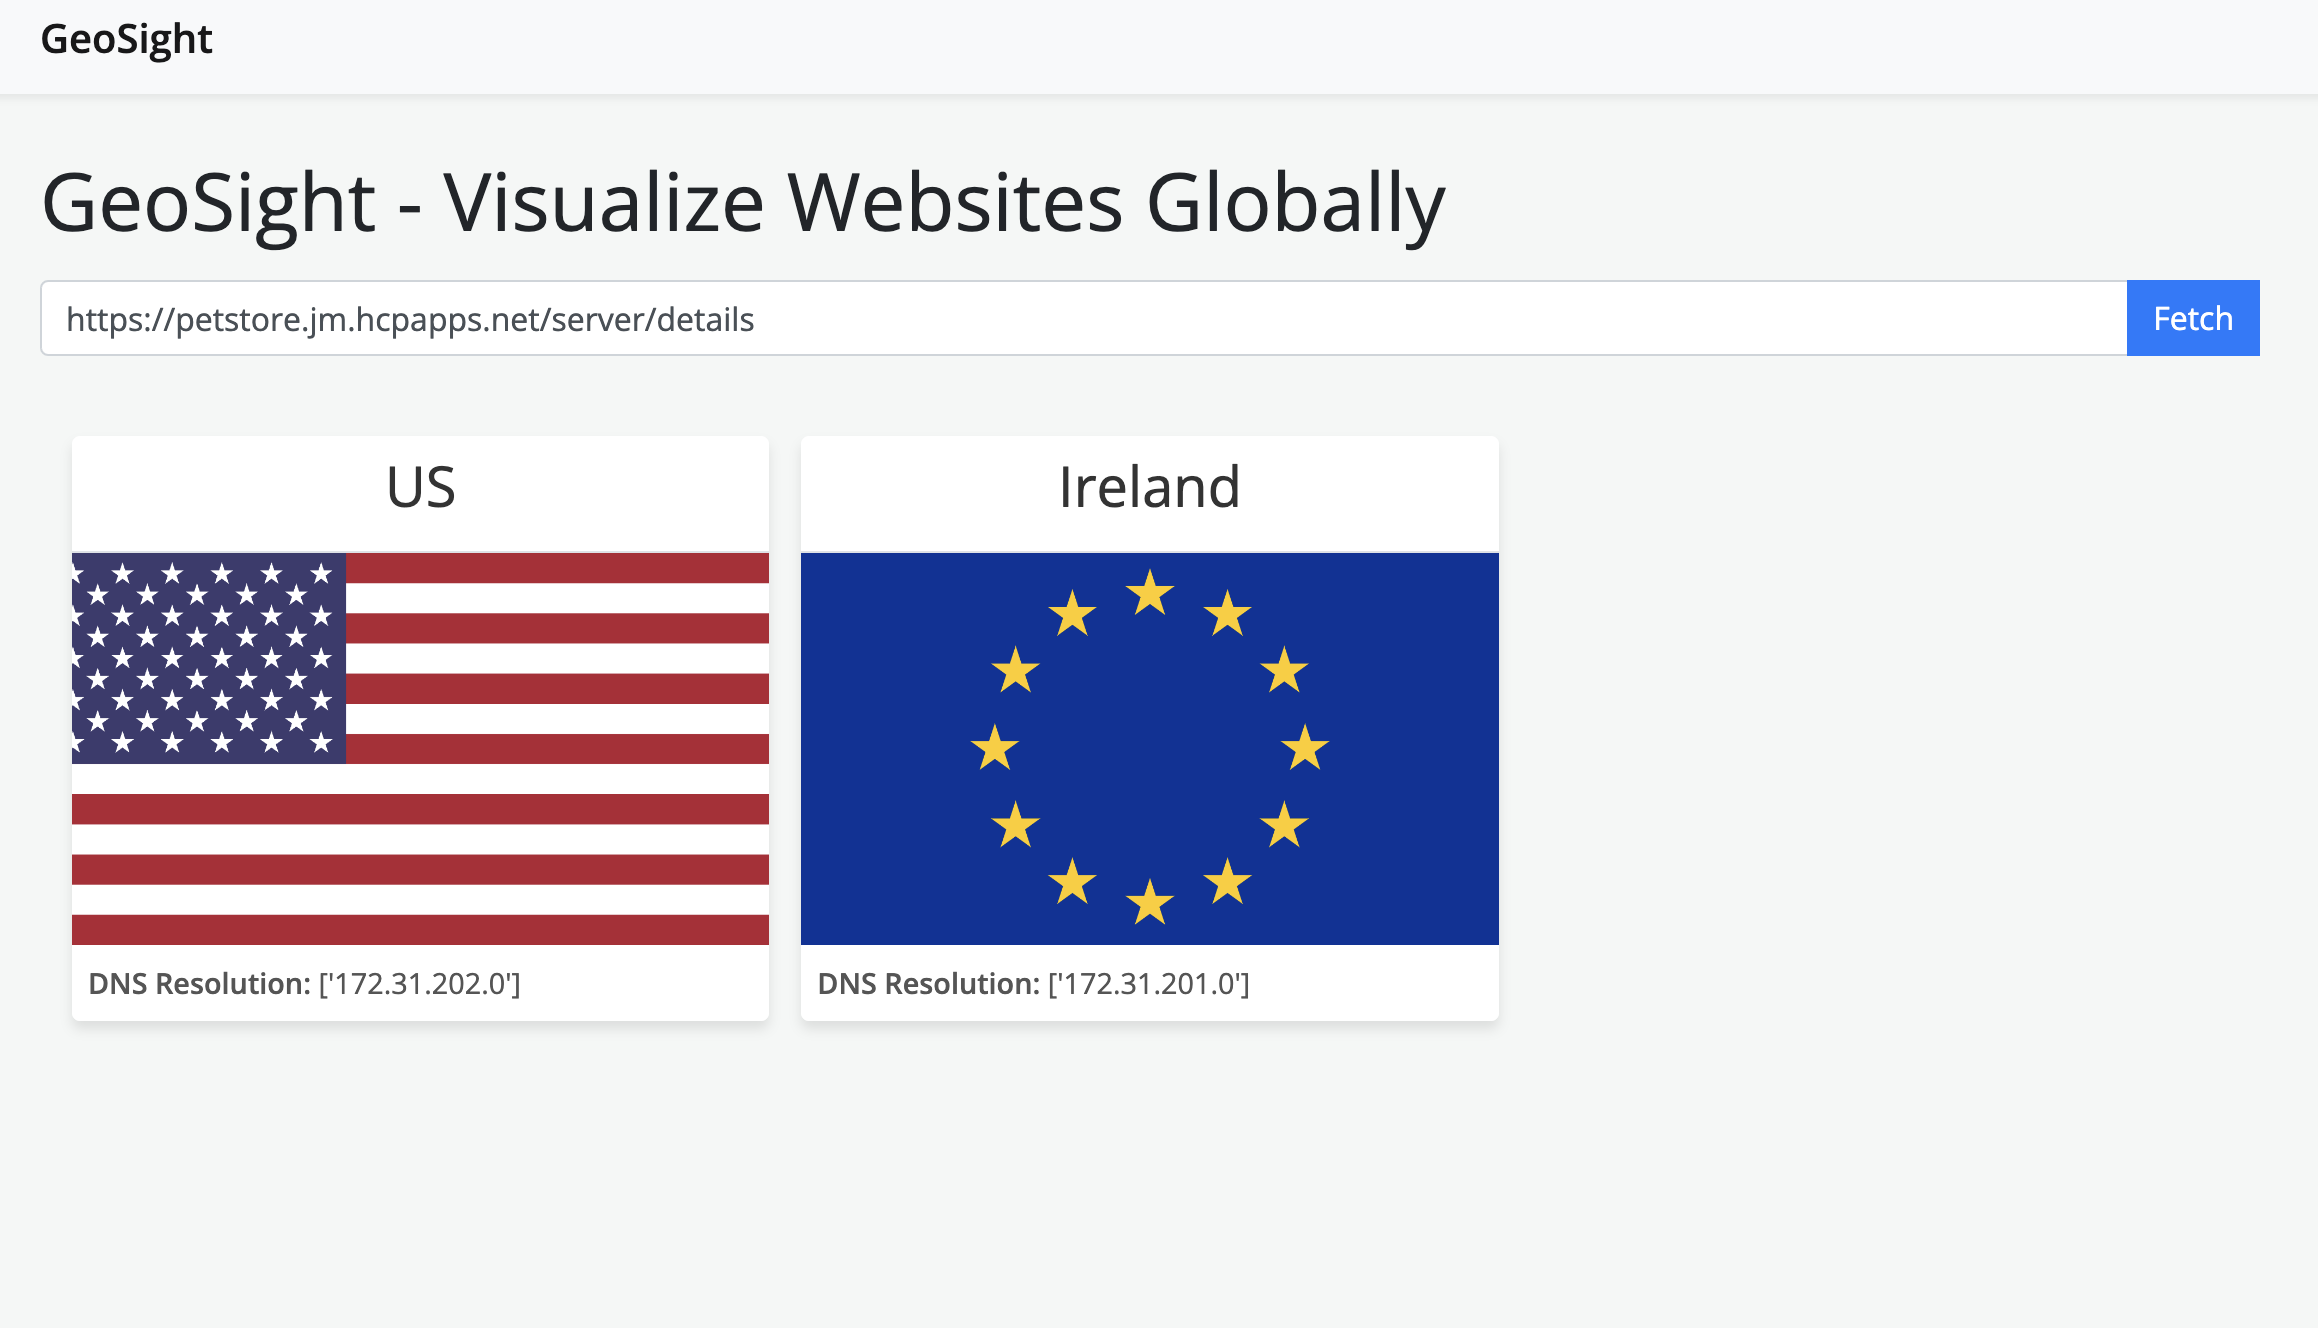
To demonstrate traffic management by geographical region, we'll use a tool called 'geosight'. This tool resolves hostnames from different regions, fetches a website from the resulting DNS record address and takes a screenshot. The petstore app has been configured to serve a flag image based on which region it is running in. In the 1st cluster, the EU flag is used. In the 2nd cluster, the US flag is used.
To install 'geosight', run the following commands:
git clone git@github.com:jasonmadigan/geosight.git && cd geosight
pip3 install -r requirements.txt
playwright install
Then run it using:
Access the webapp at http://127.0.0.1:5001/.
In the input box, type the address from below and click the Fetch button:
After a moment you should see dns results for different regions, and a corresponding screenshot.
If you want to experiment with other regions, check out the Configuration section for geosight and the Kuadrant docs for geo loadbalancing.
(App developer) API traffic monitoring
To view the App developer dashboard, the same Grafana will be used from the platform engineer steps above:
https://grafana.172.31.0.2.nip.io
The most relevant for a app developer is Stitch: App Developer Dashboard
You should see panels about API's including:
- Request and error rates
- API summaries
- API request summaries
- API duration
All corresponding to our HTTPRoute coming from our OAS spec
(Platform Engineer) APIs summary view
Now that the app developer has deployed their app, new metrics and data is now available in the platform engineer dashboard seen in the previous step https://grafana.172.31.0.2.nip.io:
- Gateways, routes and policies
- Constraints & Violations (there should be no violations present)
- APIs Summary
Summary
You now have a local environment with a reference architecture to design and deploy an API in a kube native way, using Kuadrant and other open source tools.
Cleanup
To destroy the previously created kind clusters, run:
Info
DNS records in AWS will remain after cleanup - you can remove these from your zone manually.